
You spent months researching. Maybe years saving. You crossed every hurdle a property buyer in India faces. And then the builder finally sends you that one message you have been waiting for. Possession is ready.
But you are sitting in a flat in Toronto. Or a studio apartment in Dubai. Or a rented house in Melbourne.
Flying to India just to collect keys feels expensive, exhausting, and honestly unnecessary. The good news is that NRI remote property possession in India is completely legal. It is well-established. And thousands of NRIs do it every year without stepping foot on Indian soil.
This blog is your complete guide. We will cover how to appoint the right legal representative, which documents you need to verify before the final payment, how to do a snag inspection without being physically present, and what to tick off the checklist before your flat is truly yours. By the end, you will know exactly what to do, in what order, and what mistakes to avoid.
Can NRIs Take Property Possession Without Visiting India?
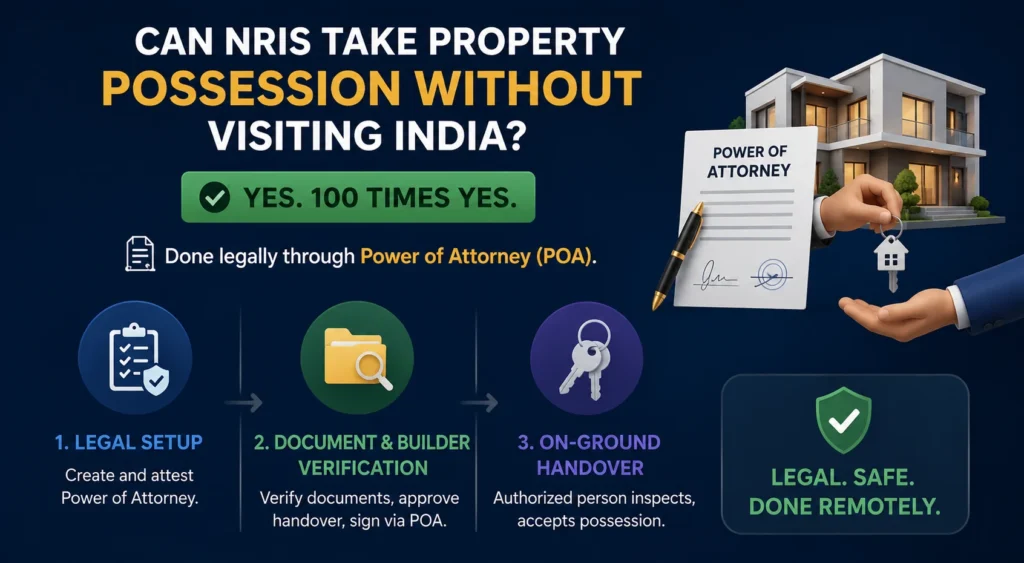
Yes. A hundred times yes.
NRIs can legally take possession of property in India without visiting. The legal tool that makes this possible is a Power of Attorney, or POA. It is a document that gives a trusted person in India the authority to act on your behalf.
This is not a grey area. It is not a loophole. The Indian Registration Act and various state-level property laws explicitly allow property transactions through an authorised representative. The process is used so routinely that most builders have a standard checklist ready for NRI buyers.
The full remote possession process involves three broad tracks. First, the legal setup. Second, the document and builder verification. Third, the on-ground operational handover. All three can be handled remotely. You just need the right people and the right plan.
Step-by-Step Process for NRI Remote Property Possession
Step 1: Appoint a Trusted Representative via Power of Attorney
Before anything else can happen, you need someone on the ground who can legally act for you. That person needs a valid Power of Attorney.
Now here is where most NRIs go wrong. They hear “POA” and assume it is just a formality. A piece of paper to hand over to a relative and move on. But the type of POA you choose matters enormously.
There are two types.
A General Power of Attorney, or GPA, is broad. It gives your representative wide authority over your property. They can sign documents, make payments, and in some cases even sell or mortgage the property on your behalf. Think of a GPA like giving someone the master key to your entire property portfolio. Not just the front door. Every lock.
A Specific Power of Attorney, or SPA, is different. You define exactly what the person is allowed to do. For possession and registration, you write it in. For everything else, the authority simply does not exist.
Always choose an SPA for possession. Always.
This is not just cautious advice. NRI property fraud cases in India often start with a broad GPA given to someone who seemed trustworthy. Once that document is in the wrong hands, reversing damage takes years of court battles.
Here is how you create and send the POA from abroad:
- Work with a property lawyer to draft the SPA. Be specific. Name the property. Name the tasks. Leave nothing open to interpretation.
- Get it notarised. You can do this at the Indian consulate or embassy in your country, or through a local notary who is recognised under the Hague Convention.
- Get it apostilled. This is a stamp from the designated authority in your country that validates the document for use in India.
- Send the original by courier to India.
- Register it at the Sub-Registrar’s office before it is used for any transaction.
That last step is important. An unregistered POA can be challenged. Builders and registration offices may refuse to accept it. Always register it first.
Step 2: Verify Builder Documents Before the Final Payment
Think of this step like checking the engine before you pay for a used car. You would not hand over the full amount and then check if the car actually runs.
There are four key documents you must verify before releasing the final payment or authorising your representative to sign off on possession.
The Occupancy Certificate (OC) is the single most important document in this list. The OC is issued by the local municipal authority. It certifies that the building was constructed as per the approved plan and is safe for people to live in. Without a valid OC, the building is technically not approved for residential occupation. Utilities like piped water and permanent electricity connections may not come through. Banks can reject home loans. And when you try to sell the flat ten years later, the missing OC becomes a massive problem.
If the builder does not have the OC, do not take possession. It does not matter how sweetly they explain that it is “in process.”
The Completion Certificate (CC) certifies that the construction itself matches the sanctioned plans. Some states treat the CC and OC as the same document. Others issue them separately. Check what applies to your state.
RERA Registration Status can be checked in two minutes on your state’s RERA portal. Every project registered under RERA should show its current status, completion timeline, and any complaints filed against the developer. This is free to access. Use it.
The Builder’s Possession Letter is the formal written notice that your flat is ready for handover. Read every line. It will mention outstanding dues, any conditions attached to possession, and the deadline by which you must take handover. Check if any payments listed surprise you.
All of this can be done from abroad. No physical presence required.
Step 3: Conduct a Snag Inspection Remotely
I remember talking to an NRI buyer who had taken possession remotely a few years ago. He skipped the snag inspection because he trusted the builder. When his parents visited the flat six months later, they found three walls with seepage damage, two bathroom fittings that did not work, and an entire stretch of flooring that had been laid unevenly. The builder’s response was simple: possession was already accepted.
A snag inspection is your last chance to hold the builder accountable: It is a room-by-room check of the flat for defects, unfinished work, damage, or anything that does not match what was promised.
You cannot be there in person. But you have options.
Option one: live video walkthrough by your representative: Ask them to do a video call with you as they walk through the flat. Go slowly. Check every room. Look at walls, floors, ceilings, tiles, bathroom fittings, kitchen, balcony, windows, and electrical points. This works if your representative knows what to look for. If they do not, it is not enough.
Option two: hire a professional property inspection service: Several companies in India now offer third-party snag inspections. They visit the flat, document every defect with photos, and give you a detailed report. Some even follow up with the builder on your behalf to get issues rectified before possession.
Option three: work with a property management company: Companies like Housewise do this as part of their NRI handover service. Their team conducts the inspection on your behalf, flags defects, and coordinates with the builder for fixes before the final handover is signed off.
Under RERA, builders are required to fix structural defects for five years after possession. But you can only enforce that if the defects were raised at or before possession. Raise them late and the builder has every reason to dispute them.
Step 4: Complete Registration and the Final Payment
Once the documents are verified and the inspection is done, it is time for the formal steps.
Property registration: happens at the Sub-Registrar’s office. Your authorised representative goes in person with the POA, signs the sale deed, and completes registration on your behalf. Stamp duty and registration charges vary by state. They are typically a percentage of the agreement value or the circle rate, whichever is higher.
Payments must go through the right accounts: Under FEMA, all property-related payments in India must be made through your NRE or NRO account. You cannot wire money from a foreign bank account directly. You cannot bring foreign currency in cash. This is not just a procedural rule. It affects your ability to repatriate the sale proceeds when you eventually sell the property.
Keep every payment record. Bank statements, NEFT receipts, confirmation emails. Treat them like gold. You will need them for capital gains calculations, future tax filings, and potential repatriation of funds.
TDS at the possession stage: depends on the nature of your transaction. For new construction from a developer, a 1% TDS typically applies if the property value exceeds Rs 50 lakh. The specifics depend on the seller’s residency status and the transaction type. Speak to a CA for your exact situation.
Step 5: Key Collection, Society NOC, and Utility Transfers
This is the part most NRIs forget. Everything else is done. The registration is through. The possession letter is signed. And then the flat sits in a half-completed operational state for months because nobody followed through on the final steps.
Key collection and acknowledgement: Your representative collects the keys and gets a written receipt confirming the date and details. Simple. But important.
Society NOC: The housing society or Resident Welfare Association needs to formally recognise you as the owner. This NOC is required later when you want to rent the flat, sell it, or even just get the intercom connected. Get it on possession day.
Electricity meter transfer: The meter needs to move from the builder’s name to yours. This usually means a visit to the electricity board office or an online application. You will need the sale deed, possession letter, and ID proof.
Water and gas connections: Same process. If connections are already in place, transfer them to your name. If they are pending, initiate the applications immediately so the flat is liveable when a tenant moves in.
Maintenance deposit: The builder may have collected an advance maintenance deposit. Confirm this amount, get a written receipt, and ensure it is transferred or accounted for with the society.
Skipping these steps creates headaches that are completely avoidable. Utilities in the builder’s name mean bills do not reach you. A missing society NOC can delay a rental agreement by weeks.
Documents NRIs Must Collect at the Time of Possession
Your representative should collect all of these at handover:
- Registered Sale Deed
- Occupancy Certificate
- Completion Certificate
- Builder’s Possession Letter
- Society NOC acknowledging you as the new owner
- Electricity, water, and gas utility transfer receipts
- Maintenance deposit acknowledgement from the society
- Key handover receipt
- Allotment letter and all payment receipts from the builder
- RERA registration certificate for the project
Scan every document. Store copies in cloud storage. Email yourself the PDFs. Keep the originals in a safe location in India, ideally with your property manager or a trusted family member who understands what they are holding.
Common Mistakes NRIs Make During Remote Possession
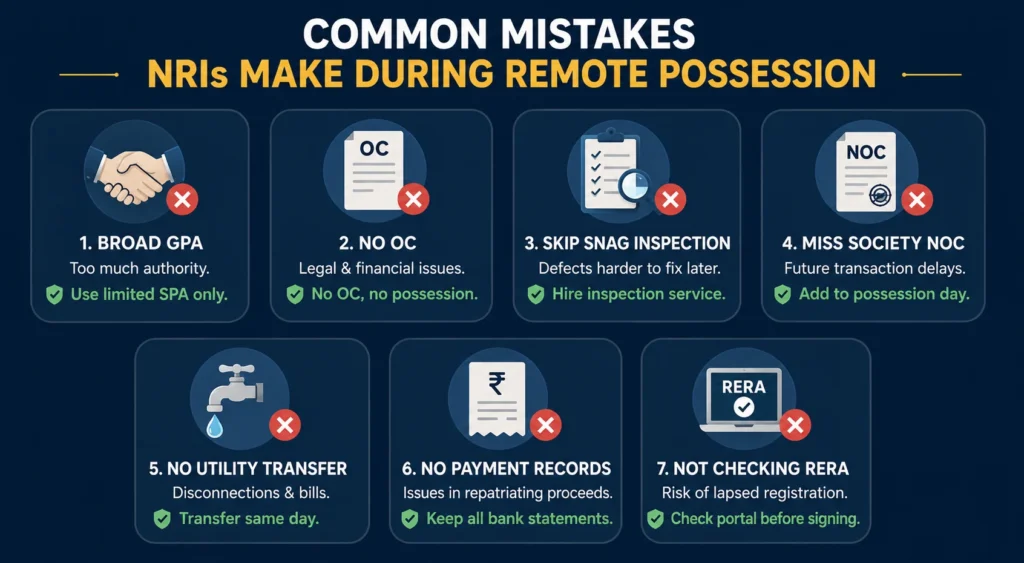
Giving a broad GPA to someone they barely know: Consequence: the representative gains more authority than intended. Potential for fraud. Fix: always use a limited SPA tied to specific tasks only.
Accepting possession without the OC: Consequence: legal, financial, and utility complications that are extremely hard to undo. Fix: no OC, no possession. Non-negotiable.
Skipping the snag inspection: Consequence: defects discovered after possession are much harder to get the builder to fix. Fix: hire a third-party inspection service or a property manager.
Missing the society NOC: Consequence: delays and complications for every future transaction involving the property. Fix: add it to the checklist for possession day.
Not transferring utilities. Consequence: disconnections, unpaid bills, tenant complaints. Fix: initiate transfers the same day keys are collected.
No documentation of FEMA-compliant payments: Consequence: problems when you eventually sell and want to repatriate proceeds. Fix: keep every bank statement and payment receipt from the entire transaction.
Not checking RERA status: Consequence: investing trust and final payment in a project with lapsed RERA registration. Fix: spend five minutes on the portal before anything is signed.
How a Property Management Company Can Help NRIs at Possession
Picture this. You are sitting in your office in Singapore. Your flat in Pune is ready for possession. Your sister agreed to help but she lives three hours away and has no idea what an OC looks like.
A property management company steps in as your operational team on the ground.
A good property manager coordinates with the builder on your behalf, follows up on pending documents, conducts the snag inspection with a trained eye, collects the keys, handles utility transfers, gets the society NOC, and can even onboard a tenant and manage the move-in immediately after possession.
Housewise does exactly this for NRI property owners across India. Every step of the possession process, from inspection to key collection to tenant onboarding, is handled on the ground. You get updates. You stay in control. But you do not have to fly back just to collect a set of keys.
The right property management company is not a luxury. For most NRIs managing possession from abroad, it is the most practical decision in the entire process.
Conclusion
Remote possession is not a compromise. Done right, it works just as well as being there in person.
The process is clear. Appoint a limited SPA. Verify the OC and RERA status before the final payment. Conduct a proper snag inspection. Complete registration through your representative. Sort utilities and the society NOC on possession day. Collect and scan every document.
Every step has a right way and a wrong way. The wrong way usually starts with cutting corners on legal setup or trusting the builder too much without verification.
If you want the entire process handled by professionals on the ground, Housewise manages the full possession journey for NRI buyers. Inspection, key collection, utility transfers, and post-possession tenant management. Reach out to the team to understand how it works for your property.
Frequently Asked Questions
Can an NRI hold property in India?
Yes. NRIs can legally own residential and commercial property in India. The restriction applies to agricultural land, plantation property, and farmhouses. These cannot be purchased by NRIs, unless inherited or received as a gift.
Can an NRI sell property in India through Power of Attorney?
Yes. An NRI can sell property through a registered POA given to a trusted representative in India. The POA must be notarised and apostilled in the country of residence before it is used for any transaction.
Can an NRI sell property without paying TDS?
No. When an NRI sells property in India, the buyer is legally required to deduct TDS at applicable rates under the Income Tax Act. The NRI can apply to the Income Tax Department for a lower deduction certificate if they are eligible for one.
What documents are required for NRI remote property possession?
The key documents include the registered sale deed, OC, builder’s possession letter, society NOC, utility transfer receipts, and maintenance deposit acknowledgement. Your representative should collect and safely store all of these on possession day.
What are the FEMA rules at the possession stage?
Every payment must go through an NRE, NRO, or FCNR account. Foreign currency in cash is not permitted. Keep full records of all transactions. This paper trail is essential for tax compliance and eventual repatriation of sale proceeds.

0 Comments